50+ PowerPoint Design Tips and Tricks Every Beginner and Expert Should Know

Updated on 14th July 2023
What are some smart PowerPoint tips that can help me ace my next presentation?
If a similar query has brought you here, then this would probably be the last guide that you will read. PowerPoint by Microsoft is the most popular tool to create all sorts of presentations. Initially released in 1990, the application has undergone several changes and upgrades in the last 3 decades. Apart from its desktop applications, it is now also available for iOS, Android, and even on the web.
Needless to say, with so many features to offer, it can be a bit overwhelming at times to use PowerPoint. Chances are that there could be numerous PowerPoint design tips and functions that you might not be aware of. Don’t worry! I’m here to help you be a PowerPoint ninja with some of the best tips that both beginners and experts can make the most of.
Without much ado, let’s get to know more about these essential tips in detail!
1. Prepare an Outline
Before you start working on PowerPoint, make sure that you have a detailed outline for your presentation. This will not only save your time but would also help you come up with a detailed slideshow. You will not forget about any crucial point and can segregate your content into different slides in advance. You can use any text editor like Word or Google Docs for this.
2. Follow a Minimalistic Approach
Remember, your presentation should work as a visual aid. It should follow you and not the other way round. Most of the experts recommend having a minimalistic approach while drafting a slideshow. It is advisable to go with a standard and basic layout that should not confuse your audience. Also, limit the amount of textual content you use in your slides. Just focus on the crucial points and explain them with your own words rather than the standard content on your slideshow.
3. Pick a Readily Available Layout
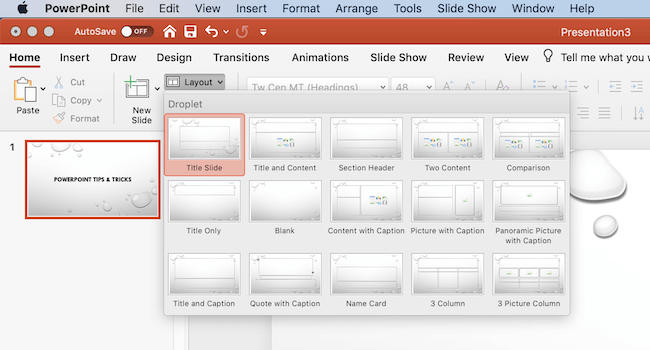
To make things easier for you, PowerPoint already provides numerous layouts that you can pick. For instance, if you want to compare two things, then just pick a readily available layout instead of adding a new slide. To view them, just click on the “Layout” option on the toolbar and pick a preferred option to fit your content.
4. Copy Formatting Style
Too many times, while merging documents or copying slides, the overall formatting of the entire document gets distorted. With the help of the format painter, you can maintain a consistent look in your slideshow. The feature will let you copy formatting (not the content) from one place and paste it to another entity. Just select the source object and use the Format Painter feature to copy it. Now, you can double click the objects to apply the new format.
5. Don’t Neglect Your Textual Content
While most of the people focus on images, sounds, and transitions in a presentation, they forget the things they can do with plain textual content. Just select a textbox and visit Shape Format -> Quick Styles from the toolbar. Here, you can see a wide range of styling features available for it. From Word Art to rotations, and custom styles to shape outlines – there are so many things you can do here. Though, make sure that you don’t overdo it and that the formatting should go well with the rest of the content.
6. Work on Background Styles
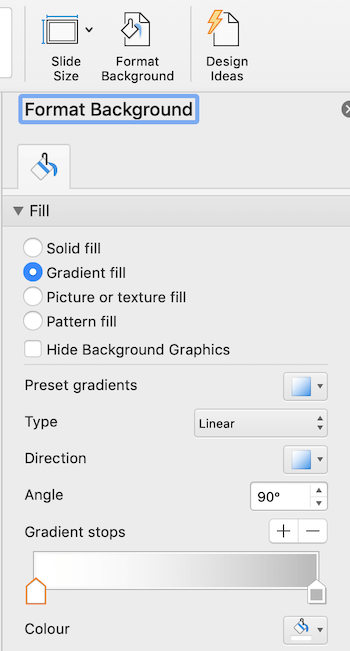
This is one of the most understated PowerPoint design tips that a lot of people ignore. If you want to add a personal touch to your slideshow, focus on its most important thing first – its background. For this, you can go to the Format Background feature under the Design tab and explore it. Apart from selecting inbuilt background styles, you can also import an image as a background.
Furthermore, you can visit the “Format Background” option to play with the image background and various other features to use solid colors. This includes setting custom transparency, gradient fill, etc.
7. Edit Your Pictures without Any Third-party Tool
Just like any other presentation tool, PowerPoint also lets you include pictures and all kinds of graphics. It also provides tons of editing options to customize these pictures. Once you insert an image, go to its Pictures tool to explore these options. You can set its contrast, brightness, recolor it, and do much more. You will also get options to set frames, alignments, and all other kinds of picture effects.
8. Put Pictures in a Shape
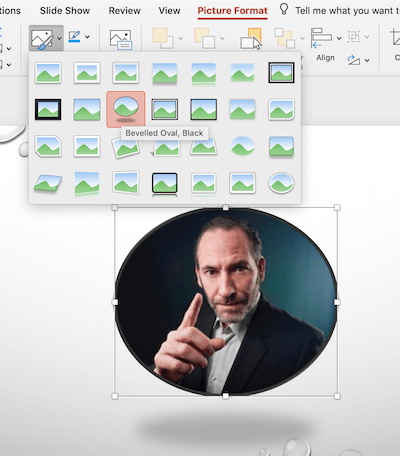
While a lot of people are not aware of these design tips, they will certainly be extremely resourceful. Using PowerPoint, you can align a picture in the form of a shape. Just go to Picture Format>Quick Styles and choose from the available options. There are many options for you to adjust your picture.
9. Create Customized Icons
You might already know that there are tons of third-party sources from where you can access icons for your presentations. You can also go to the Insert > Icons feature from the ribbon to access a wide range of icons for free. Though, if you want, you can create your own icon on PowerPoint as well. Firstly, go to Insert > Shapes to add one or more shapes. Later, select them and go to Shape Format > Merge Shapes and select a preferred option from here to create a unique icon of your choice.
10. Edit Shapes
If you want, you can also create custom shapes for your presentation. Firstly, insert any shape of your choice from the toolbar and select it. Right-click and go to the “Edit Points” feature. Now, you can set custom points to edit the shape the way you like. You can further change its layout, color, and much more.
11. Align All Graphics
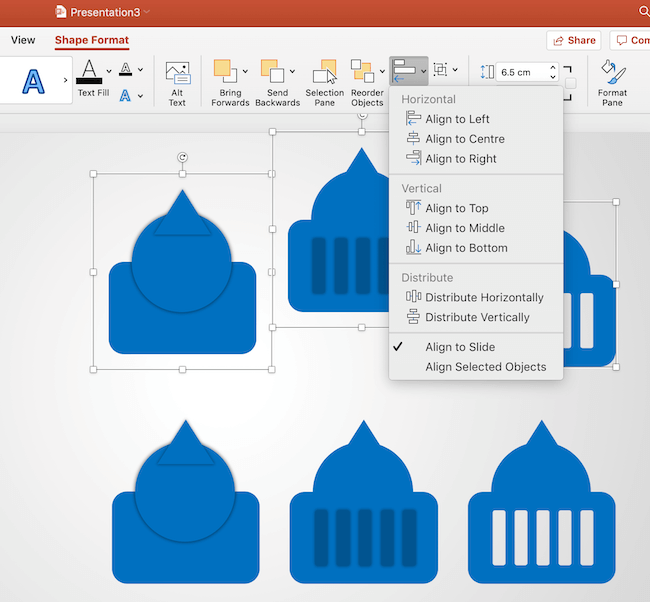
If you have a lot of graphics like images and icons in your slides, then they might clutter your presentation. The quickest way to fix this is by aligning all your graphics together. Since PowerPoint has an inbuilt feature for this, you don’t have to go through any technical jargon to understand it. Just select multiple graphics (by pressing the CTRL key) and go to Shape Format > Align. This will give you different options to align your graphics in a more uniform manner.
12. Combine/Merge/Subtract Multiple Shapes (To Create New Shapes)
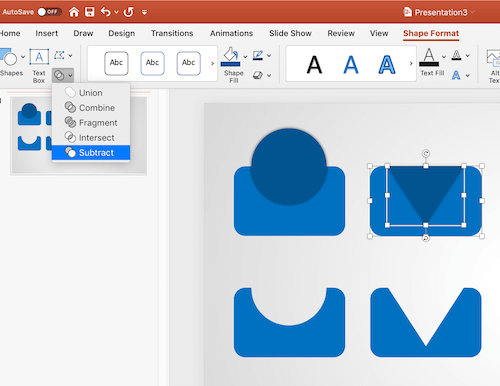
Just like creating customized icons, you can come up with new shapes on PowerPoint as well. All you need to do is insert the shapes of your choice to a slide and select them (by using the CTRL key). Once multiple shapes are selected, go to Drawing Tools > Format > Merge Shape. Here, you can intersect, subtract, add, and do so many things to come up with a new shape.
13. Write Circular (Curved) Text Around Any Shape
A lot of people prefer to write their text in a symmetrical way around a circle or any other similar shape. This provides a more uniform visual appeal to the slide and you would get brownie points for the artistic touch too. You might already know that there is no way to insert a curved text box in PowerPoint. Therefore, you can apply some text effects on it to make it circular. Just select your linear text and go to Shape Format > Transform to change it. You can learn more about text formatting in detail in this video.
14. Rotate or Flip a Text Box, Shape, Word Art, or Picture

Just like circular text, there are times when we need to rotate or flip any other textual or visual content to make it look more appealing. This is one of those tips that a lot of people don’t know, yet it would be pretty helpful to many. As of now, PowerPoint allows to rotate or flip text boxes, Word art, pictures, and shapes. To do this, just click on the object and go to the Shape Format tab. From here, click on “Rotate” to get features like Rotate 90 degrees left/right, flip vertical/horizontal, and more options.
15. Use the New Zoom Feature
This feature is only applicable to the latest version of PowerPoint. Under the Insert > Zoom field, you can see three new zoom features – Summary, Section, and Slide Zoom.
The Summary Zoom feature would provide an entire summary of your slideshow with a dedicated table of contents. With the Section or Slide Zoom, you can just move from one section/slide to another. For instance, you can move from slide 1 to 10 directly without going through slides 2 to 9.
16. Create Impressive Infographics Like a Pro!
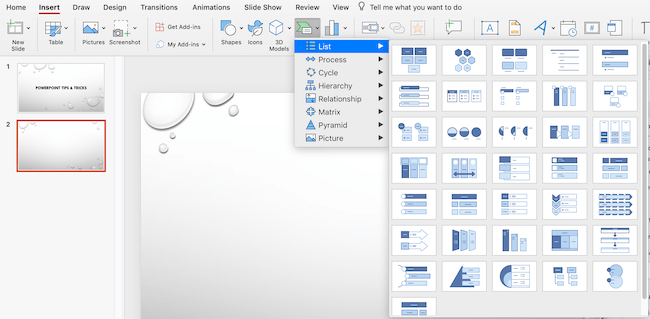
We all know how important infographics and other visual aids are while presenting a complex topic. One of the best tips is related to the SmartArt feature of the tool that helps create impressive infographics on the go. You can go to Insert > SmartArt feature to explore this option. Alternatively, you can just select a piece of information, go to the toolbar, and directly convert it to a SmartArt. You can select the perfect layout for the PowerPoint infographic and later make the needed edits to save time.
17. Change the Text Direction
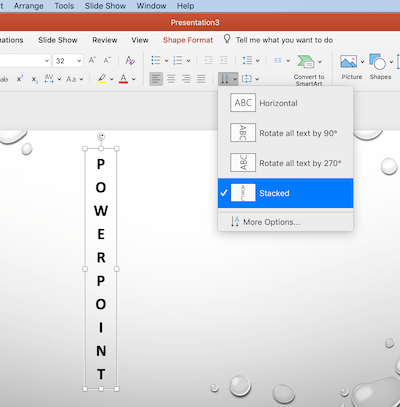
If you really want to stand out from the crowd, then you need to use the tips & tricks that others don’t know. For instance, the Text Direction feature in PowerPoint is seldom used, but can certainly make your textual content highlight. Simply select a textbox and go to the Text Direction option on the toolbar. From here, you can rotate the text in different angles or just stack it to make it look cool!
18. Generate Random “Lorem ipsum” Text
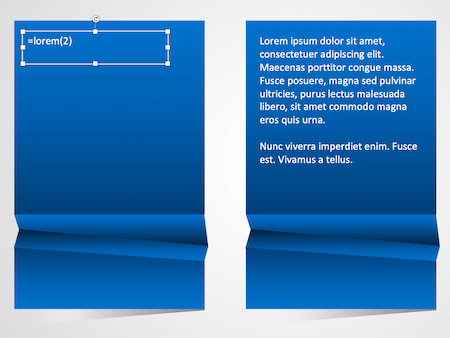
Lorem Ipsum is a universal placeholder for text that is used in graphics, website designing, and other places. If you also wish to show the placement of the text in your slideshow, then you can use this inbuilt feature. Simply insert any text box or shape to your slide and type “=lorem(x)” (without the quotes). Here, “x” would be replaced by the number of paragraphs you want. For instance, to enter 2 paragraphs, just type =lorem(2) and press enter.
19. Prefer Working with a Master Slide
Most of the experts already know the importance related to a master slide. Consider this as a root slide in your document. Any change that you would make on your master slide would automatically be reflected on the other slides. Therefore, you don’t have to make minor changes on each slide individually. Just access the Master Slide from View Option -> Slide Master and explore its features to save your time in editing.
20. Customize the Slide Size and Orientation
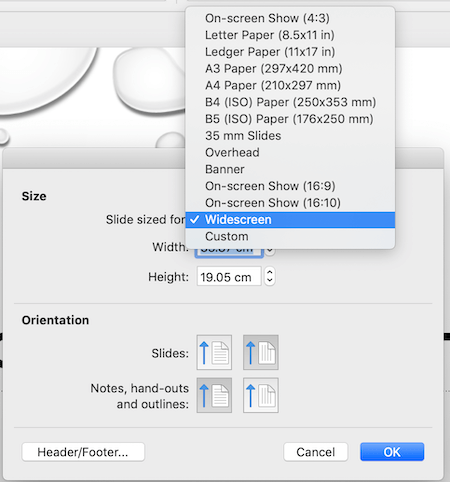
A lot of times, we end up drafting presentations in the wrong orientation or size when we have a restricted screen to work on. Apart from that, if you wish to take a print of your slideshow, then you should also consider this feature. Just go to the “Slide Size” feature under the Design tab. This will let you change the orientation of the slides and even set customized height and width for each slide. In this way, you can set a customized size for your slideshow.
21. Make the Most of Graphs and Charts
Want to include graphs, charts, and other related illustrations in your slideshows? Just go to Insert > Charts and select the diagram that you wish to add. This will also launch an Excel sheet for you to enter your data. The chart would be drawn based on the information you have entered in the Excel sheet.
22. Have a Uniform Text Alignment
Our text is often the most neglected part in presentations. A lot of times, I see people having too much text or when it is cluttered all over. To avoid this, you can follow a uniform alignment in the entire slideshow. For instance, if you have aligned bullets or paragraphs on the left, then follow the same alignment throughout. You can access different kinds of options under the Format toolbar. Apart from the usual left, right, and center, you can also align your text in justified or distributed way. If you have a lot of text placed, then you can divide it into uniform paragraphs too.
23. Consistency is the Key
This is one of the most basic yet useful tip that you should always follow. Make sure that your entire slideshow should follow the same formatting. For example, use the same fonts for title or sub-title in the entire set, have identical bullets, color themes, and so on. If you want, you can pick an inbuilt PowerPoint theme to have a consistent design.
24. Customize the Available Themes
You might already know that PowerPoint offers different themes to save time in editing. Though, a lot of people don’t know that these themes can be further customized by choosing different color options. Just go to the Design tab to explore the available themes on PowerPoint. Afterward, you can just click on the “Colors” option and explore the pre-set color layouts that you can apply on the selected themes.
Apart from that, you can also explore the available fonts and effects that you can implement in the entire theme to maintain consistency.
25. Translate Word or Phrases
You can easily translate any text within PowerPoint. Select the text you want to translate. Go to Review Tab > Translate. Now select the language you wish to translate your current text and it’s done. You can even replace the selected text with translated text by clicking on the Insert Button.
26. Interlink Your Slides with the Action Button
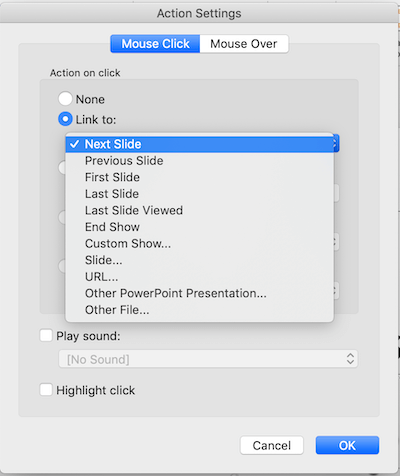
This is one of those PowerPoint design tips that the experts use. A lot of times, we don’t want to follow a linear approach while presenting. You might wish to click on a text or an image to move somewhere else. The best thing about PowerPoint is that it can make any object into an action button.
Just select the object (like a textbox or image) that you wish to link and go to Insert > Action Settings. From here, you can set specific options for a mouse click or mouse hover. You can link it to any other slide in the document or even run any program from here.
27. Create a Slide from an Outline
Most of the people know how to duplicate slides or reuse them. But do you know that you can also create a new slide from an existing outline? Just go to the “New Slide” option and choose to import slides from an outline. This will let you browse a text document (or a Word file) that you can readily use to create a new slide.
28. Use Online Picture/Clip Art (Selectively)
As you know, Microsoft PowerPoint offers a wide range of online pictures (it is called clip art in old versions) that you can include in our documents. Though, most of the time, it is recommended not to use too many vectors in a slide. If you want, you can go to the Insert tab >Pictures -> Online Pictures (Clip Art) and explore the available graphics. Simply select an add-on graphic to the slide and later customize it. Also, you can consider using third-party professional vectors instead of clip arts.
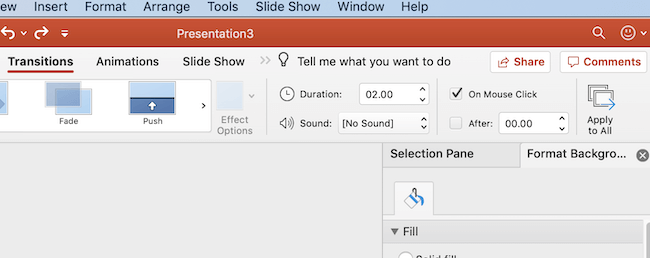
29. Use Transitions Thoughtfully
Microsoft PowerPoint is well-known for the wide range of transitions that it offers. Though, a lot of times, users over-do it, which turns their audience off. Here you must understand that, there is nothing wrong with using no transition at all. If you do, make sure that you stick with a single transition type for the entire slideshow. You can go to the Transitions feature for this and select an appropriate option. Just make sure that you test the transition before giving your final presentation.
30. Use the Automatic Advance Transition Option
If you know there won’t be any interruption in between, then consider using an automatic advance transition option. Under the Transitions tab, you can find the Auto Advance function to set a particular duration for every slide. This could be anything from a second to a few minutes. I would highly recommend practicing your timing in advance several times to ace this feature.
31. Rehearse Your Timing
This PowerPoint trick will help you ace your presentation if you have a limited duration. Under the Slide Show tab, just go to the “Rehearse Timings” feature to explore this. It will let you analyze how much time you spend on a particular slide and the entire presentation. You can also compare it with the auto-advance timing to work on your delivery.
32. Record Your Slideshow
Microsoft PowerPoint also provides a playback option, which lets you record your slideshow. This feature can help you make educational videos and content of all kinds for the web. To access this, just click on the “Record Slide Show” feature under the Slideshow tab. You can also attach your microphone and record your voice with the slideshow.
33. Access Only the Outline
If you are in a rush and don’t want to go through the entire presentation, then just visit the View Tab ->“Outline View”. This will display all the textual content of the document that you can read without any visual aid. If you want, you can just copy this content and paste it in any other document.
34. Embed Audio and Videos
Besides photos, there are numerous other ways to make your slideshows more interesting. If you want, you can add sound and video content to your document. You can go to the Insert tab and select if you wish to insert a sound or a video. This will give you options to browse the available library of Microsoft or go to a location on your system where the media is stored. It will also let you record sound right from PowerPoint that you can later add to your presentation.
35. Place a Video as a Background for Your Slides
Yes, you have read it right! Apart from images, you can set videos as a background for your slides. All you need to do is drag and drop a video on your slide and adjust its size to fit as a background. If the video is short, then you can just go to its Video Tools > Playback and put it on loop.
36. Embed Fonts in PowerPoint
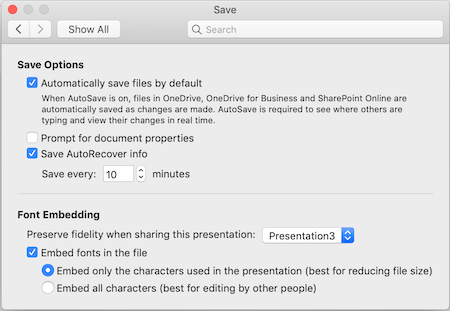
If you work in an organization or for a client who has their own fonts, then this PowerPoint tip will come handy to you. Ideally, the application lets you embed fonts so that the presentation won’t be affected even when it runs on another system. To access this feature, you can go to File > Options > Save > Preserve Fidelity when sharing this presentation. Make sure that the option for “Embed fonts in the file” is enabled here. This will further give you an option to embed specific or all characters in the file.
37. Use the B and W Keys while Presenting
This is one of those PowerPoint tricks that would help you present detailed presentations easily. If you want your audience to focus on you rather than the slide, then just press the “B” key (during slideshow). This will black out the screen and your slide won’t be visible. To get it back, just press any other key or use your mouse pointer. Similarly, you can press the “W” key to white-out the entire screen.
38. Try the Morph Transition
If you want to have a true seamless transition between your slides, then you should try the Morph transition feature. Though, you should know that the transition is only available for Office 365 subscribers as of now. To implement it, you need to make sure that both the slides should have at least one common object. The object can be a text box, shape, Word Art, picture, and so on (does not support Charts).
You can just go to the Transitions tab and select “Morph” from here. Later, you can go to Transitions > Effect Options to implement the selected effects on the objects.
39. Draw Using PowerPoint
It might sound surprising, but PowerPoint is equipped with a native feature that you can use to draw all kinds of figures. To access it, just go to the Review tab and click on “Start Inking”. Office 365 users can find the “Draw” option listed here instead. This will give you an option to switch between different kinds of pens, highlights, colors, and much more. You can use any slide as a canvas and can later export the slide as an image (JPEG) to use it with other applications.
40. Customize Your PowerPoint Experience
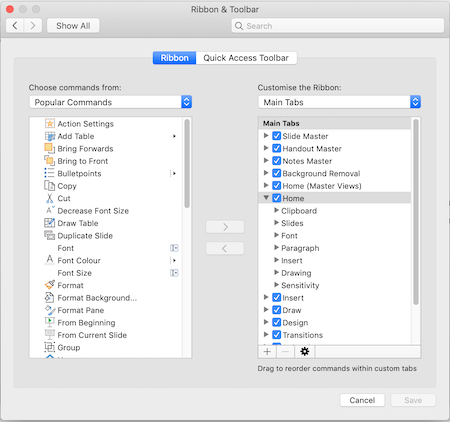
Not every PowerPoint feature can be accessed from the main toolbar. Sometimes, we need to dig a little deeper. If you want, you can go to the PowerPoint Tab>Preferences> Ribbon & Toolbar to further explore these features. Apart from that, you can also customize the interface from here. Just select the options that you wish to access from the toolbar and get rid of any unimportant feature.
41. Switch the Default Language
As of now, Microsoft PowerPoint supports 100+ languages that you can switch from on its interface. Just go to Tools > Language for this. Though, your system should have the required fonts to support some of these languages. In this way, you can work on an impressive presentation in the language of your choice.
42. Insert Any Other Object
From Bitmaps to Excel sheets and Word documents to PDFs – there are so many other things that you can add to your slides. To get this option, just click on Insert > Object and select the file you wish to add. You can create a new file or browse an existing document. This will embed the file to your slide without actually pasting its content.
43. Capture Screenshots On the Go
This is one of the most resourceful features that I often use even beyond drafting presentations. You can take screenshots of different screens and clip them. Just go to the Insert tab on the toolbar and click on the “Screenshot” option. Here, you can see thumbnails of the available screens. Subsequently, you can also clip a part of the screen with the “Screen Clipping” feature here.
44. Create New Autocorrect Options and Shortcuts
If you are tired of manually correcting certain words, formulae, special symbols, etc., then you should certainly check the Autocorrect Options. This will let you manually create new rules and shortcuts for the Autocorrect feature. To access this, just go to PowerPoint Options > Autocorrect Options. Here, you can enter the desired characters, symbols, words, and even phrases, and what they would be replaced with.
45. Customize the Undo Option
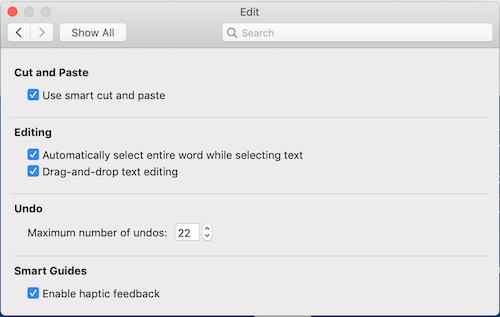
Undo is the inbuilt feature in all the MS Office applications that lets you revoke/retrace an action. By default, most of the applications support undo a maximum of 20 actions that you can easily change. Just go to PowerPoint Options from the File and visit the “Advanced” section. In the latest version, you can find the option at PowerPoint -> Preferences -> Edit. Here, you can manually change how many times users are allowed to “undo” an action.
46. Use Stock Assets
A lot of people make the common mistake of using the same inbuilt graphics, background pictures, clip art, videos, etc., that are already available in PowerPoint. While they might be easily accessible, chances are that your audience could be used to seeing them. To impress them, you can take the assistance of dedicated stock photos, vectors, fonts, and tons of media content. There are several free stock websites that you can check to include impressive visual content in your slideshow.
47. Invite Collaborators
It is a common misconception that PPT presentations don’t support real-time collaboration (like Google Slides). In fact, Microsoft has provided two different solutions to collaborate with others on a PPT presentation. You can go to your OneDrive account and access the PowerPoint Online feature. This will let you create your presentation on the web and share it with others. Furthermore, Microsoft has also come up with SharePoint to provide dedicated features for web collaboration on MS Office applications.
If you want, you can go through this video tutorial to learn how to upload your presentation on One Drive or use its PowerPoint Online feature.
48. Compress Photos in PowerPoint
Do you have a lot of photos that you need to send? Don’t worry, you don’t have to use any image compression tool for this. Just launch PowerPoint and add the images that you wish to compress. Afterward, just go to File -> “Compress Pictures” option on the toolbar and explore its settings. You can remove corrupted areas of the pictures and set a custom target for the pictures to compress.
49. Save Your Slideshows as Read-only
A lot of times, you wish to share a read-only copy of a presentation. With this trick, you can do the same pretty easily. Choose the “Save As” feature instead of “Save” to get different options to export your file. You can save it as a PDF or XPS file from here or export it as a PowerPoint Show (.PPSX) document. You can even save your document as pictures in JPEG, PNG, or TIFF formats.
50. Secure Your File
If you have any sensitive content on your slideshow, then you need to take some extra measures to protect it. Thankfully, PowerPoint allows you to encrypt the file with a password. Go to File > Password and set the password. The other users can only access the file after verifying its password.
51. Use Add-ins
While PowerPoint has tons of features to offer, sometimes users need to have more control on their documents. In this case, you can explore the “Add-ins” feature. Just go to the PowerPoint Options (or the Insert) tab to enable add-ins. You can also visit the Office Store to explore all kinds of third-party add-ins. Just be sure that you install an add-in from a trusted developer to your application, else it might corrupt your files.
52. Use Professional PowerPoint Templates
A lot of PowerPoint users experience the lack of readily available templates offered by the application. The good news is that there are numerous places where you can get professionally-designed PowerPoint templates. For instance, SketchBubble has a vast collection of well-researched and 100% editable layouts that you can use without any trouble. All these presentations are designed by professionals and are equipped with several features.
Since they are completely editable, you can easily customize them entirely without any prior design experience. From engineering to management and academics to finance – SketchBubble has PPT slides of all kinds.
There you go! After learning these resourceful PowerPoint tips and tricks, you would certainly be able to use the application like a pro. To make it easier for you, I have listed tips keeping both beginners and experienced users in mind. Besides that, there are several other features that you can access. Do you have any expert PowerPoint design tips that you would like to share with our readers? Feel free to let us know about your PPT tricks or tips in the comments below!
Note: The above screenshots are taken on Office 365 – PowerPoint Version 16.29 (MAC). The options may appear different depending on the version you’re using and the size of your screen.
